เครื่องมือประมวลผลแรสเตอร์
ตัวอย่างนี้แสดงเครื่องมือแรสเตอร์และการประมวลผลรูปภาพบางส่วนที่ KDRM สร้างขึ้นสำหรับเวิร์กโฟลว์แรสเตอร์แบบอัตโนมัติ เครื่องมือเหล่านี้มีประโยชน์สำหรับงานต่างๆ เช่น การตัดแรสเตอร์เป็นกลุ่มไปยังพื้นที่ที่สนใจ การสุ่มตัวอย่างแรสเตอร์ใหม่ให้มีความละเอียดเอาต์พุตที่ต้องการ การเตรียมอินพุตแรสเตอร์สำหรับการวิเคราะห์ในภายหลัง และลบขั้นตอนการประมวลผลด้วยตนเองที่ทำซ้ำช้าๆ ออกจากเวิร์กโฟลว์การจัดส่งขนาดใหญ่
ตัวอย่างด้านล่างเน้นที่แพ็คเกจ Python แบบโอเพ่นซอร์สเท่านั้น ในทางปฏิบัติ เครื่องมือประเภทนี้สามารถทำงานเป็นสคริปต์แบบสแตนด์อโลน งานประมวลผลตามกำหนดเวลา หรือฝังไว้ในเวิร์กโฟลว์เดสก์ท็อปที่กว้างขึ้นใน ArcGIS Pro หรือ QGIS ขึ้นอยู่กับสภาพแวดล้อมไคลเอนต์และวิธีดำเนินการเวิร์กโฟลว์
เครื่องมือเหล่านี้ใช้ทำอะไร
- การตัด DEM, DTM และแรสเตอร์อื่น ๆ เป็นกลุ่มไปยังพื้นที่ที่สนใจ
- การสุ่มตัวอย่างแรสเตอร์ใหม่เพื่อจัดขนาดเซลล์สำหรับการคำนวณและการสร้างแบบจำลองในภายหลัง
- การกรองและตรวจสอบอินพุตแรสเตอร์ก่อนการวิเคราะห์ดาวน์สตรีม
- ขั้นตอนการประมวลผลแรสเตอร์อัตโนมัติที่อาจต้องใช้เวลาหลายชั่วโมงในการทำงานด้วยตนเอง
- การสร้างไปป์ไลน์การประมวลผลแรสเตอร์ที่สามารถทำซ้ำได้ซึ่งสามารถรันในสภาพแวดล้อมเดสก์ท็อป เซิร์ฟเวอร์ หรือบรรทัดคำสั่ง
ทำไมเราถึงสร้างเครื่องมือแบบนี้
เราสร้างระบบอัตโนมัติแบบกำหนดเองสำหรับโปรเจ็กต์ที่ใช้แรสเตอร์จำนวนมากเป็นประจำ เนื่องจากประสิทธิภาพ ความสามารถในการทำซ้ำ และความสามารถในการพกพาเป็นสิ่งสำคัญ บางครั้งข้อกำหนดก็คือการทำงานเป็นเวิร์กโฟลว์โอเพ่นซอร์สล้วนๆ โดยไม่มีการพึ่งพา ArcGIS ในกรณีอื่นๆ ตรรกะเดียวกันจำเป็นต้องอยู่ภายในเวิร์กโฟลว์ ArcGIS Pro หรือ QGIS เพื่อให้นักวิเคราะห์สามารถรันกระบวนการภายในสภาพแวดล้อมเดสก์ท็อปที่คุ้นเคย แนวทางพื้นฐานจะเหมือนกัน: ทำให้ส่วนที่ซ้ำกันเป็นอัตโนมัติ รักษาตรรกะให้โปร่งใส และทำให้เวิร์กโฟลว์เรียกใช้และสนับสนุนได้ง่ายขึ้น
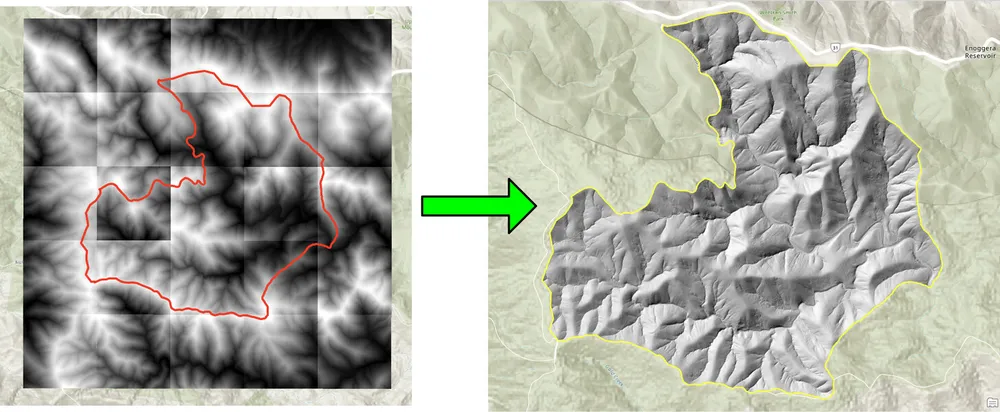
ตัวอย่างการคลิปด้านล่างถูกสร้างขึ้นสำหรับเวิร์กโฟลว์ที่แรสเตอร์การคลิปเป็นกลุ่มโดยใช้วิธีเดสก์ท็อปแบบเดิมช้าเกินไป การเขียนกระบวนการใหม่ด้วยแพ็คเกจ Python แบบโอเพ่นซอร์สทำให้เวิร์กโฟลว์เร็วขึ้นและใช้งานได้จริงมากขึ้นสำหรับคอลเลกชันแรสเตอร์ขนาดใหญ่ ตัวอย่างการสุ่มตัวอย่างใหม่ถูกสร้างขึ้นด้วยเหตุผลที่คล้ายกัน โดยที่ชุดข้อมูลแรสเตอร์ขนาดใหญ่จำเป็นต้องจัดแนวให้ตรงกับขนาดเซลล์เอาท์พุตที่ละเอียดยิ่งขึ้น เพื่อให้การคำนวณแรสเตอร์ในภายหลังสามารถทำงานได้ที่ความละเอียดที่ต้องการ
ตัวอย่างที่ 1 แรสเตอร์การตัดเป็นกลุ่มด้วย Python โอเพ่นซอร์ส
import json
import numpy as np
import os
import rasterio
import shutil

from rasterio.mask import mask
from shapely.geometry import shape
# the input and output directories for the rasters
input_directory = "input"
output_directory = "output"

# delete and recreate the output directory
if(os.path.exists(output_directory)):
    shutil.rmtree(output_directory)

os.makedirs(output_directory)

feature_collection = dict()

with open('national_park.geojson', 'r') as f:
    feature_collection = json.load(f)
area_of_interest = feature_collection['features'][0]['geometry']
clip_area = shape(area_of_interest)

for file in os.listdir(input_directory):
    # filter by tif files and only files with 2019 in the name
    if file.endswith('.tif') and '2019' in file:
        print(file)

        input_raster = os.path.join(input_directory, file)
        output_raster=os.path.join(output_directory, file)
        with rasterio.open(input_raster) as src:
            try:
                out_image, out_transform = mask(src, [clip_area], crop=True)

                # Set all nodata values to -99999
                out_image[out_image == src.nodata] = -99999
                raster_intersected = not np.all(out_image == -99999)
                # Check if the clip area intersects the raster and only save the raster if the clip area intersects with it
                if raster_intersected:
                    out_meta = src.meta.copy()
                    out_meta.update(
                        {
                            "driver": "GTiff",
                            "height": out_image.shape[1],
                            "width": out_image.shape[2],
                            "transform": out_transform,
                        }
                    )
                    with rasterio.open(output_raster, "w", **out_meta) as dest:
                        dest.write(out_image)

            except Exception as err:
                if ('Input shapes do not overlap raster' not in str(err)):
                    print('### Error with {} ###'.format(input_raster))
                    print(err)
                pass
ตัวอย่างที่ 2 การสุ่มตัวอย่างแรสเตอร์ด้วยโอเพ่นซอร์ส Python
import os
from osgeo import gdal

import numpy as np
import os

# the input and output directories
input_directory = 'input/DTM'
output_directory = 'output/DTM'

if not os.path.exists(output_directory):
    os.makedirs(output_directory)
for root, dirs, files in os.walk(input_directory):
    for file in files:
        if(file.endswith('.tif')):
            input_file = os.path.join(root, file)
            output_file = os.path.join(output_directory, file)

            print(file)

            # Read the input raster file
            raster = gdal.Open(input_file)
            # Get the original cell size
            cell_size = raster.GetGeoTransform()[1]
            # print('Original cell size: {}'.format(cell_size))

            # Calculate the number of cells for the output
            num_cells = int(np.ceil(cell_size / 0.5))
            # Create the output raster file
            driver = gdal.GetDriverByName('GTiff')
            out_raster = driver.Create(output_file, raster.RasterXSize * num_cells,
                                    raster.RasterYSize * num_cells, 1,
                                    gdal.GDT_Float32)

            # Set the output raster's projection
            out_raster.SetProjection(raster.GetProjection())
            # Set the output raster's geotransform
            out_raster_geo = list(raster.GetGeoTransform())
            out_raster_geo[1] = 0.5
            out_raster_geo[5] = -0.5
            out_raster.SetGeoTransform(out_raster_geo)

            nodata = -99999

            for i in range(1, out_raster.RasterCount + 1):
                # set the nodata value of the band
                out_raster.GetRasterBand(i).SetNoDataValue(nodata)
            # Copy the input raster data to the output raster
            gdal.ReprojectImage(raster, out_raster,
                                raster.GetProjection(),
                                out_raster.GetProjection(),
                                gdal.GRA_NearestNeighbour)

            # Close the files
            out_raster = None
            raster = None
ตัวเลือกการจัดส่ง
ตัวอย่างข้างต้นเป็นจงใจเรียบง่าย แต่แนวทางเดียวกันนี้สามารถขยายออกไปสำหรับเวิร์กโฟลว์การผลิตขนาดใหญ่ด้วยการบันทึก การตรวจสอบ การประมวลผลแบบขนาน การตรวจสอบเมตาดาต้า การบรรจุหีบห่อ และการบูรณาการเข้ากับไปป์ไลน์การจัดส่ง GIS ที่กว้างขึ้น เราสามารถจัดหาเครื่องมือเหล่านี้เป็นสคริปต์แบบสแตนด์อโลน เครื่องมือที่ผสานรวมเดสก์ท็อปสำหรับ ArcGIS Pro หรือ QGIS หรือบริการที่ใช้งานจริงโดยเป็นส่วนหนึ่งของแพลตฟอร์มข้อมูลเชิงพื้นที่ที่กว้างขึ้น ทั้งนี้ขึ้นอยู่กับความต้องการของลูกค้า