Mga Tool sa Pagproseso ng Raster
Ipinapakita ng halimbawang ito ang ilan sa raster at mga tool sa pagproseso ng imahe na ginawa ng KDRM para sa pag-automate ng mga raster workflow. Ang mga tool na ito ay kapaki-pakinabang para sa mga gawain tulad ng mga batch clipping raster sa isang lugar ng interes, resampling ng mga raster sa isang kinakailangang resolution ng output, paghahanda ng mga input ng raster para sa pagsusuri sa ibang pagkakataon, at pag-alis ng mabagal na paulit-ulit na manu-manong mga hakbang sa pagproseso mula sa mas malalaking daloy ng trabaho sa paghahatid.
Ang mga halimbawa sa ibaba ay nakatuon lamang sa mga open-source na pakete ng Python. Sa pagsasagawa, ang mga tool na tulad nito ay maaaring patakbuhin bilang mga standalone na script, naka-iskedyul na mga trabaho sa pagpoproseso, o naka-embed sa loob ng mas malawak na desktop workflow sa ArcGIS Pro o QGIS, depende sa kapaligiran ng kliyente at kung paano kailangang patakbuhin ang workflow.
Para saan ginagamit ang mga tool na ito
- Batch clipping DEM, DTM, at iba pang mga raster sa isang lugar ng interes.
- Pag-resampling ng mga raster upang ihanay ang mga laki ng cell para sa mga susunod na kalkulasyon at pagmomodelo.
- Pag-filter at pagpapatunay ng mga input ng raster bago ang pagsusuri sa ibaba ng agos.
- Pag-automate ng mga hakbang sa pagproseso ng raster na kung hindi man ay tatagal ng mga oras ng manu-manong trabaho.
- Bumuo ng mga nauulit na raster-processing pipeline na maaaring patakbuhin sa desktop, server, o mga command-line na kapaligiran.
Bakit tayo gumagawa ng mga tool tulad nito
Regular kaming gumagawa ng custom na automation para sa mga proyektong mabigat sa raster dahil mahalaga ang performance, repeatability, at portability. Minsan ang kinakailangan ay tumakbo bilang isang purong open-source na daloy ng trabaho nang walang dependency sa ArcGIS. Sa ibang mga kaso, ang parehong lohika ay kailangang maupo sa loob ng isang ArcGIS Pro o QGIS workflow upang mapatakbo ng mga analyst ang proseso sa loob ng isang pamilyar na desktop environment. Ang pinagbabatayan na diskarte ay pareho: i-automate ang mga paulit-ulit na bahagi, panatilihing transparent ang lohika, at gawing mas madaling muling patakbuhin at suportahan ang daloy ng trabaho.
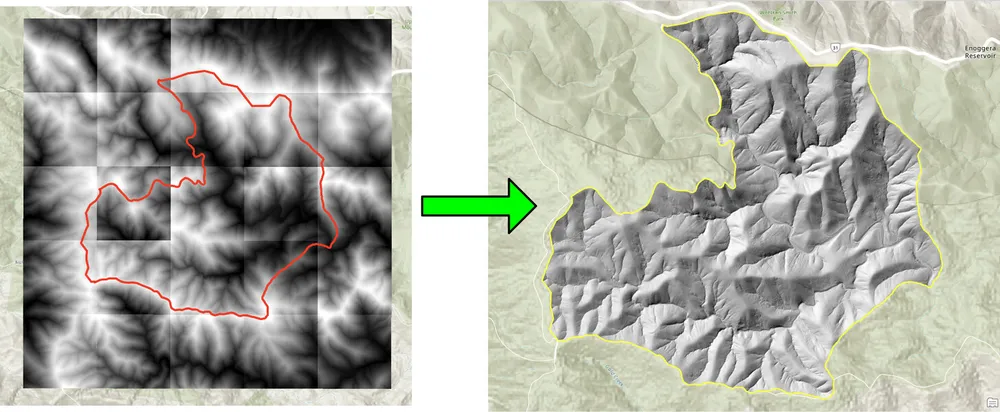
Ang halimbawa ng clipping sa ibaba ay ginawa para sa isang workflow kung saan masyadong mabagal ang mga batch clipping raster na may tradisyonal na desktop approach. Ang muling pagsusulat ng proseso gamit ang open-source na mga pakete ng Python ay ginawang mas mabilis at mas praktikal ang daloy ng trabaho para sa mas malalaking koleksyon ng raster. Ang halimbawa ng resampling ay binuo para sa isang katulad na dahilan, kung saan ang malalaking raster dataset ay kailangang ihanay sa isang mas pinong laki ng output ng cell upang ang mga pagkalkula ng raster ay maaaring tumakbo sa kinakailangang resolution.
Halimbawa 1. Batch clipping raster na may open-source na Python
import json
import numpy as np
import os
import rasterio
import shutil

from rasterio.mask import mask
from shapely.geometry import shape
# the input and output directories for the rasters
input_directory = "input"
output_directory = "output"

# delete and recreate the output directory
if(os.path.exists(output_directory)):
    shutil.rmtree(output_directory)

os.makedirs(output_directory)

feature_collection = dict()

with open('national_park.geojson', 'r') as f:
    feature_collection = json.load(f)
area_of_interest = feature_collection['features'][0]['geometry']
clip_area = shape(area_of_interest)

for file in os.listdir(input_directory):
    # filter by tif files and only files with 2019 in the name
    if file.endswith('.tif') and '2019' in file:
        print(file)

        input_raster = os.path.join(input_directory, file)
        output_raster=os.path.join(output_directory, file)
        with rasterio.open(input_raster) as src:
            try:
                out_image, out_transform = mask(src, [clip_area], crop=True)

                # Set all nodata values to -99999
                out_image[out_image == src.nodata] = -99999
                raster_intersected = not np.all(out_image == -99999)
                # Check if the clip area intersects the raster and only save the raster if the clip area intersects with it
                if raster_intersected:
                    out_meta = src.meta.copy()
                    out_meta.update(
                        {
                            "driver": "GTiff",
                            "height": out_image.shape[1],
                            "width": out_image.shape[2],
                            "transform": out_transform,
                        }
                    )
                    with rasterio.open(output_raster, "w", **out_meta) as dest:
                        dest.write(out_image)

            except Exception as err:
                if ('Input shapes do not overlap raster' not in str(err)):
                    print('### Error with {} ###'.format(input_raster))
                    print(err)
                pass
Halimbawa 2. Pag-resampling ng mga raster gamit ang open-source na Python
import os
from osgeo import gdal

import numpy as np
import os

# the input and output directories
input_directory = 'input/DTM'
output_directory = 'output/DTM'

if not os.path.exists(output_directory):
    os.makedirs(output_directory)
for root, dirs, files in os.walk(input_directory):
    for file in files:
        if(file.endswith('.tif')):
            input_file = os.path.join(root, file)
            output_file = os.path.join(output_directory, file)

            print(file)

            # Read the input raster file
            raster = gdal.Open(input_file)
            # Get the original cell size
            cell_size = raster.GetGeoTransform()[1]
            # print('Original cell size: {}'.format(cell_size))

            # Calculate the number of cells for the output
            num_cells = int(np.ceil(cell_size / 0.5))
            # Create the output raster file
            driver = gdal.GetDriverByName('GTiff')
            out_raster = driver.Create(output_file, raster.RasterXSize * num_cells,
                                    raster.RasterYSize * num_cells, 1,
                                    gdal.GDT_Float32)

            # Set the output raster's projection
            out_raster.SetProjection(raster.GetProjection())
            # Set the output raster's geotransform
            out_raster_geo = list(raster.GetGeoTransform())
            out_raster_geo[1] = 0.5
            out_raster_geo[5] = -0.5
            out_raster.SetGeoTransform(out_raster_geo)

            nodata = -99999

            for i in range(1, out_raster.RasterCount + 1):
                # set the nodata value of the band
                out_raster.GetRasterBand(i).SetNoDataValue(nodata)
            # Copy the input raster data to the output raster
            gdal.ReprojectImage(raster, out_raster,
                                raster.GetProjection(),
                                out_raster.GetProjection(),
                                gdal.GRA_NearestNeighbour)

            # Close the files
            out_raster = None
            raster = None
Mga pagpipilian sa paghahatid
Ang mga halimbawa sa itaas ay sadyang simple, ngunit ang parehong diskarte ay maaaring palawigin para sa mas malalaking daloy ng trabaho sa produksyon na may pag-log, pagpapatunay, parallel na pagproseso, pagsusuri ng metadata, packaging, at pagsasama sa mas malawak na mga pipeline ng paghahatid ng GIS. Depende sa kinakailangan ng kliyente, maaari naming ibigay ang mga tool na ito bilang mga standalone na script, desktop-integrated na tool para sa ArcGIS Pro o QGIS, o mga productionised na serbisyo bilang bahagi ng isang mas malawak na spatial data platform.