光栅处理工具
此示例展示了 KDRM 为自动化光栅工作流程而创建的一些光栅和图像处理工具。这些工具对于以下任务非常有用,例如将栅格批量剪切到感兴趣的区域、将栅格重新采样到所需的输出分辨率、准备栅格输入以供以后分析以及从较大的交付工作流程中删除缓慢的重复手动处理步骤。
下面的示例仅关注开源 Python 包。实际上,此类工具可以作为独立脚本、计划处理作业运行,也可以嵌入到 ArcGIS Pro 或 QGIS 中更广泛的桌面工作流程中,具体取决于客户端环境以及工作流程的操作方式。
这些工具的用途
- 将 DEM、DTM 和其他栅格批量剪切到感兴趣的区域。
- 重新采样栅格以对齐像元大小,以便以后的计算和建模。
- 在下游分析之前过滤和验证栅格输入。
- 自动执行光栅处理步骤,否则需要花费数小时的手动工作。
- 构建可在桌面、服务器或命令行环境中运行的可重复光栅处理管道。
为什么我们构建这样的工具
我们定期为光栅密集型项目构建自定义自动化,因为性能、可重复性和可移植性很重要。有时,要求是作为纯开源工作流运行,而不依赖于 ArcGIS。在其他情况下,相同的逻辑需要位于 ArcGIS Pro 或 QGIS 工作流程中,以便分析师可以在熟悉的桌面环境中运行该流程。基本方法是相同的:自动化重复部分,保持逻辑透明,并使工作流程更容易重新运行和支持。
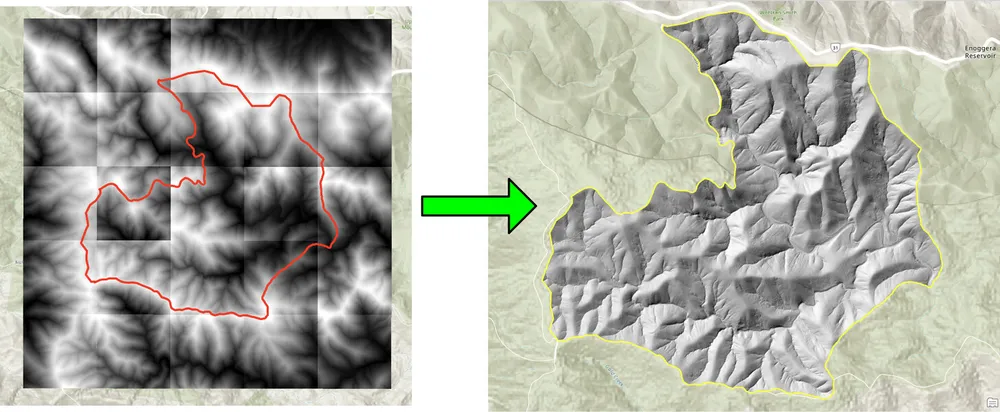
下面的裁剪示例是针对使用传统桌面方法批量裁剪栅格速度太慢的工作流程创建的。使用开源 Python 包重写该流程使得工作流程对于更大的栅格集合来说显着更快且更实用。出于类似的原因构建了重采样示例,其中大型栅格数据集需要与更精细的输出像元大小对齐,以便以后的栅格计算可以以所需的分辨率运行。
示例 1. 使用开源 Python 批量裁剪栅格
import json
import numpy as np
import os
import rasterio
import shutil

from rasterio.mask import mask
from shapely.geometry import shape
# the input and output directories for the rasters
input_directory = "input"
output_directory = "output"

# delete and recreate the output directory
if(os.path.exists(output_directory)):
    shutil.rmtree(output_directory)

os.makedirs(output_directory)

feature_collection = dict()

with open('national_park.geojson', 'r') as f:
    feature_collection = json.load(f)
area_of_interest = feature_collection['features'][0]['geometry']
clip_area = shape(area_of_interest)

for file in os.listdir(input_directory):
    # filter by tif files and only files with 2019 in the name
    if file.endswith('.tif') and '2019' in file:
        print(file)

        input_raster = os.path.join(input_directory, file)
        output_raster=os.path.join(output_directory, file)
        with rasterio.open(input_raster) as src:
            try:
                out_image, out_transform = mask(src, [clip_area], crop=True)

                # Set all nodata values to -99999
                out_image[out_image == src.nodata] = -99999
                raster_intersected = not np.all(out_image == -99999)
                # Check if the clip area intersects the raster and only save the raster if the clip area intersects with it
                if raster_intersected:
                    out_meta = src.meta.copy()
                    out_meta.update(
                        {
                            "driver": "GTiff",
                            "height": out_image.shape[1],
                            "width": out_image.shape[2],
                            "transform": out_transform,
                        }
                    )
                    with rasterio.open(output_raster, "w", **out_meta) as dest:
                        dest.write(out_image)

            except Exception as err:
                if ('Input shapes do not overlap raster' not in str(err)):
                    print('### Error with {} ###'.format(input_raster))
                    print(err)
                pass
示例 2. 使用开源 Python 对栅格进行重采样
import os
from osgeo import gdal

import numpy as np
import os

# the input and output directories
input_directory = 'input/DTM'
output_directory = 'output/DTM'

if not os.path.exists(output_directory):
    os.makedirs(output_directory)
for root, dirs, files in os.walk(input_directory):
    for file in files:
        if(file.endswith('.tif')):
            input_file = os.path.join(root, file)
            output_file = os.path.join(output_directory, file)

            print(file)

            # Read the input raster file
            raster = gdal.Open(input_file)
            # Get the original cell size
            cell_size = raster.GetGeoTransform()[1]
            # print('Original cell size: {}'.format(cell_size))

            # Calculate the number of cells for the output
            num_cells = int(np.ceil(cell_size / 0.5))
            # Create the output raster file
            driver = gdal.GetDriverByName('GTiff')
            out_raster = driver.Create(output_file, raster.RasterXSize * num_cells,
                                    raster.RasterYSize * num_cells, 1,
                                    gdal.GDT_Float32)

            # Set the output raster's projection
            out_raster.SetProjection(raster.GetProjection())
            # Set the output raster's geotransform
            out_raster_geo = list(raster.GetGeoTransform())
            out_raster_geo[1] = 0.5
            out_raster_geo[5] = -0.5
            out_raster.SetGeoTransform(out_raster_geo)

            nodata = -99999

            for i in range(1, out_raster.RasterCount + 1):
                # set the nodata value of the band
                out_raster.GetRasterBand(i).SetNoDataValue(nodata)
            # Copy the input raster data to the output raster
            gdal.ReprojectImage(raster, out_raster,
                                raster.GetProjection(),
                                out_raster.GetProjection(),
                                gdal.GRA_NearestNeighbour)

            # Close the files
            out_raster = None
            raster = None
交付选项
上面的示例故意简单,但相同的方法可以扩展到更大的生产工作流程,包括日志记录、验证、并行处理、元数据检查、打包以及集成到更广泛的 GIS 交付管道中。根据客户要求,我们可以将这些工具作为独立脚本、ArcGIS Pro 或 QGIS 桌面集成工具或作为更广泛空间数据平台一部分的生产化服务提供。